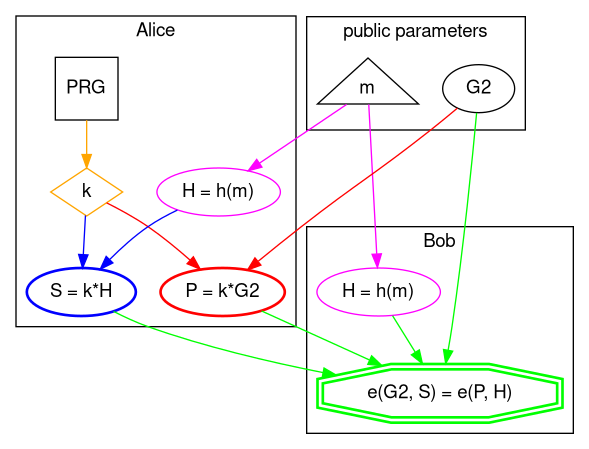
From a high level perspective this is how BLS (also known as Boneh–Lynn–Shacham) signature scheme works.

  import sys
  sys.path.append("/home/icostan/Repos/pairings.py" )
  import bn256

  # helper function
  def h(msg: bytes) -> object:
      return bn256.g1_hash_to_point(msg);

  # public parameters
  m = b"Hello BLS!"
  G2 = bn256.twist_G

  # Alice
  k = bn256.rand_elem() # private key (orange)
  P = G2.scalar_mul(k)  # public key generation (red)
  H = h(m)              # hash to curve point (magenta)
  S = H.scalar_mul(k)   # signing (blue)
  # Alice sends public key 'P' and signature 'S' to Bob

  # Bob
  H = h(m)                        # hash to curve point (magenta)
  v1 = bn256.optimal_ate(G2, S)   # signature pairing
  v2 = bn256.optimal_ate(P, H)    # message pairing
  "YOU ARE A CRYPTOSTAR!" if v1 == v2 else "YOU SUCK!" # verification (green)
'YOU ARE A CRYPTOSTAR!'
Nomenclature
A bit of naming conventions first, because shapes, colors, and names have meaning:
Names
- capital letter: point on elliptic curve
- lower case: integer or bytes array
- *: elliptic curve (scalar) multiplication
- PRG: Pseudo-Random Generator
Shapes
- ellipse: elliptic curve operation, points on curves
- rectangle: number generator
- diamond: large integer (scalar)
- double octagon: pairings
- triangle: bytes array
Colors
- orange: private key
- magenta: hash the message to elliptic curve point
- red: public key generation
- blue: signing
- green: verification
Details
0. Library
Import BN256 elliptic curve pairing library.
  import sys
  sys.path.append("/home/icostan/Repos/pairings.py" )
  import bn256
  bn256
<module 'bn256' from '/home/icostan/Repos/pairings.py/bn256.py'>
1. Public parameters
Besides message m and generator G2 that are shown below we also know:
- elliptic curves EC2 and EC1 with generator G1
- target extension field TF.
but they are hidden in Barreto-Naehrig 256-bit (BN256) curve implementation.
  # helper function
  def h(msg: bytes) -> object:
      return bn256.g1_hash_to_point(msg);

  # public parameters
  m = b"Hello BLS!"
  G2 = bn256.twist_G
  type(G2)
<class 'bn256.curve_twist'>
2. Key generation
This is as simple as randomly generating private key k then multiply by generator G2 to obtain the public key, which is another point on EC2.
  # Alice
  k = bn256.rand_elem() # private key (orange)
  P = G2.scalar_mul(k)  # public key generation (red)
  type(P)
<class 'bn256.curve_twist'>
3. Signing
To sign the message m Alice has to hash the message to elliptic curve and get a point on EC1 then multiply that by private key k to obtain the signature S which is a point on EC1.
  H = h(m)              # hash to curve point (magenta)
  S = H.scalar_mul(k)   # signing (blue)
  type(S)
  # Alice sends public key 'P' and signature 'S' to Bob
<class 'bn256.curve_point'>
4. Verification
Bob receives public key P and signature S from Alice and hashes the message to curve to calculate the same H point in EC1.
Now comes the beautiful, yet so powerful part of pairing-based cryptography. Bob uses generator G2 and signature S to calculate one side of the equation, then public key P and point H to calculate the other side, if equality holds then signature is valid.
  # Bob
  H = h(m)                        # hash to curve point (magenta)
  v1 = bn256.optimal_ate(G2, S)   # signature pairing
  v2 = bn256.optimal_ate(P, H)    # message pairing
  type(v2)
  "YOU ARE A CRYPTOSTAR!" if v1 == v2 else "YOU SUCK!" # verification (green)
<class 'bn256.gfp_12'> 'YOU ARE A CRYPTOSTAR!'
Pairing intuition
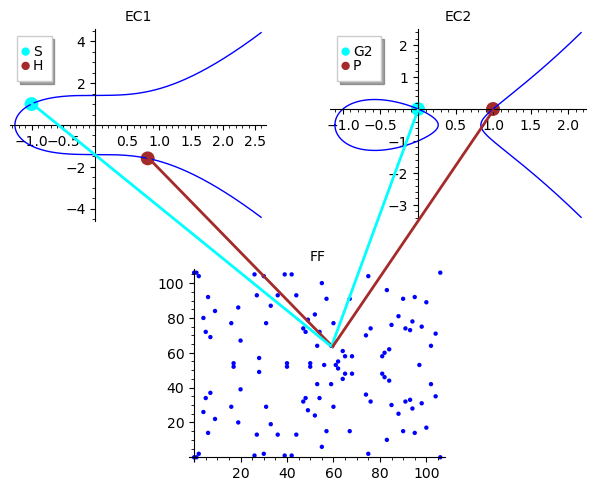
Now, the math behind pairings is quite complicated and to be honest I do not fully understand it (yet) but at least we can have a simplified visual intuition using 2 elliptic curves over rational numbers and a finite field.

You can also check the references below, lots of good resources to learn from.
Happy pairing!
References
- https://vitalik.ca/general/2017/01/14/exploring_ecp.html
- https://electriccoin.co/blog/snark-explain7/
- https://blog.statebox.org/elliptic-curve-pairings-213131769fac
- https://www.youtube.com/watch?v=8WDOpzxpnTE
- https://asecuritysite.com/pairing
- https://asecuritysite.com/encryption/bn
- https://asecuritysite.com/encryption/bn02
- https://doc.sagemath.org/html/en/reference/arithmetic_curves/sage/schemes/elliptic_curves/ell_point.html
- https://www.sagemath.org/files/thesis/hansen-thesis-2009.pdf
- https://doc.sagemath.org/html/en/thematic_tutorials/group_theory.html
- https://en.wikipedia.org/wiki/BLS_digital_signature
- https://members.loria.fr/AGuillevic/pairing-friendly-curves/
- https://neuromancer.sk/std/bn/bn254
- https://github.com/randombit/pairings.py/
- https://www.di.ens.fr/~fouque/pub/latincrypt12.pdf
- https://randombit.net/bitbashing/posts/bls_hashing_fail.html
- https://www.normalesup.org/~tibouchi/papers/bnhash-scis.pdf
- https://medium.com/cryptoadvance/bls-signatures-better-than-schnorr-5a7fe30ea716
- https://medium.com/@srikarv/the-bls-signature-scheme-a-short-intro-801c723afffa
- https://crypto.stanford.edu/pbc/thesis.pdf
- https://github.com/asanso/CryptoWithSageMath
- https://ask.sagemath.org/question/49663/efficiently-computing-tower-fields-for-pairings/
- https://curves.xargs.org/
- https://www.ietf.org/archive/id/draft-irtf-cfrg-hash-to-curve-10.html